Saturday, April 30, 2011

Happy Blog Day: Day 101

Many Thanks to Resweater!
My blog was featured on her blog today...
Friday, April 29, 2011

And thank you to all of you who visited here today in response to her post.
I appreciate your comments and support.
It's been a GREAT DAY.

And now, not to forget why I am here...
another project.
My project choice today is inspired by Betz White. This is from her Easy Repurposed Pillows.
Check out the link HERE for details.
This project will be a pillow cover with sweater fabric on the front and a nifty envelope closure on the back using the front of a buttoned flannel shirt. If this doesn't make sense now, it will later.
 This is the flannel shirt I have chosen for the backing which will be the envelope closure that Betz has so brilliantly created with this pillow cover design.
If you look closely you can see the pins that I placed so I know where I need to cut for my pillow.

Here is the sweater I have chosen for the front of the pillow cover.
Remembrances of my Barn Owl!

My pillow form.
It measures 13 1/2" square, so I will cut that measurement from the sweater and from the shirt.


I must carry this project over until tomorrow.
Deciding what to make, finding just the right fabric choices, measuring carefully, and slipping in some viewing of the Royal Wedding was all I could fit in to my day...along with my regular work schedule. Whew! So many important things to do, so little time!

Hope you had a wonderful day, too!

Thursday, April 28, 2011

Time For Celebration: DAY 100!

A Landmark Today!
100 Days of Project-Making.
Hooray! 
It Feels Great.

When I started The Sweater Project I had no idea that it would lead me in all the wonderful directions it has. It also doesn't feel like I have been crafting, writing, and photographing for 100 days. It seems like just yesterday I started with trepidation..."What! Me? Write a blog? Eeeekkk."

But here I am, loving every minute of it.

I want to thank those of you who have been following my blog and giving me such great support, comments, suggestions, and friendship. It seems that I have found new friends just through blogging. Not only that, but I have found a community of great crafters who are gratefully sharing their talents and ideas with me. 

Thank you to all of you!
You are most DEAR.

Here is my project for today:

A Wool Dryer Ball

I cut out 3 sections of the sweater fabric.
This I designed after what I called a "Sweater Ball" that I made for my cat last Fall.
(That is the gray ball with the orange ribbon in the photo.)

My Assistant making sure things go smoothly and that no hanging strings go without being grabbed!

 Dryer balls need to be all wool to retain the characteristics of absorbency and of an anti-static nature to fulfill their function (in place of the "dryer sheets" that are the commercial variety and apparently full of not-so-natural qualities and ingredients).
Here is my stash of left over sweater scraps, thread, and ribbons that I have been accumulating.
I needed to sift through this mass to get only the sweater wool pieces for stuffing my ball.

The chosen pieces to use.
(Not including the bunny!)

The 3 sections of the ball are stitched with a small opening in which to place the stuffing pieces.

And of course one of my favorite tools, the Chopstick, to  push the pieces down into the ball and to  even out any lumps.

Here is the stuffed Dryer Ball completed.
Not beautiful, but very functional.

I did throw in one side with the cable stitched part of the sweater.

Here you can see the triangular nature of the Dryer Ball.

I guess now it's time to do laundry!

Wednesday, April 27, 2011

Hobby Horse Completed: Day 99! Almost to 100!!!

Little Brown Horse Ready To Ride

It was fun finishing this project...just the easy touches to wrap him up:

1-Stuffing.
2-Blanket stitch to close the bottom seam.

Here is my little Hobby Horse. 
A distant photo, but I wanted you to see his riding stick as well.

A handsome steed, don't you think?

 Head shots to show off his handsomeness...

I'm so glad I gave him 2 ears.
More character this way, and as I said last night...being anatomically correct is important.  :-]
This is my favorite photo of Hobby Horse.
He almost looks like he is coming to life! Look at that cute smirk...and the way he has cocked his ears.

Full profile view.
Different lighting. 

And not to forget the STARS of the finishing touches (in alphabetical order):

Chopsticks
Pincushion with large eye needle
Prism "embroidery" thread
 Scissors, small very sharp
Stuffing material

HOORAY!

More Hobby Horse: Day 98

Thoughts
And
Little Brown Horse

Thoughts:

I find that I am becoming a craft blog junkie. This morning I spent...well I won't tell you how much actual... time meandering the Internet for tutorials, blogs, crafting information, as well as checking my regular blog sites (Resweater, for example!) to see what's out there. There is so much information that it can be quite the information overload, though I can't feel that way myself. If there's something I want to try that I don't want to forget where the heck I found, I will either print it (if printable and I think it is something I want to do soon), or bookmark it for future reference. But NOW my morning is gone :-/.

Do any of you have this problem?
(I think a Global Club is needed here.)
What do you think?
Eeekkk!


Now on to:
Little Brown Horse


It is morning officially. About 20 minutes after Midnight. However, this post counts for Tuesday, April 26, 2011. Not a surprise, as you know my usual modus operandi is to burn the midnight oil.
Tonight it's even a little later than usual for me. A late start, but here are the accomplishments for this evening...

Left nostril.

Right nostril.
Aside: I can't claim any part of being great at creating these, but here they are.
Hobby Horse is happy with them.
And of course the main thing is that he can breathe now!

As I was stitching to close the seams I decided to leave the ears open so he can have two ears.
Nothing like being anatomically correct!

Old pony only had the profile with one ear, but he is dear this way.
He really had only one good side, too. But that's another story.

They do like each other :-].

Blanket stitch around the edges.
A little fuzzy...sorry.

Just a note about my projects:

One of the reasons I love making things with felted sweaters is that I am crazy for recycling, reusing, and reducing in general. For most all of the things I make I am using what I have. (Except for the forays to thrift stores for MORE sweaters. That in itself is definitely in the reusing category. )
My history of sewing is long: I have been stitching my little heart out since I was under 10 years old. This explains my vast array of sewing notions, fabric, the right scissors for the right job, etc.

For this Hobby Horse project the only thing that is new is the thread I used to do the blanket stitch to make the seam around the edge of the horse's head.
I love this Prism brand. No mess to pull apart the strands as in normal embroidery thread (though it is perfect for some projects), and it fits most of my needs well. It is a great thickness.

Just in case you haven't tried it, this is what the mega package looks like with it's great selection of colors:


Back to Hobby Horse again:
I will need one more day to finish him.
He needs stuffing and the last touches to get him out on the trail.

See you tomorrow!

Monday, April 25, 2011

Hobby Horse & Misc: Day 97


Some Updates
And
Continuing With Hobby Horse

Some regrouping was done today with my Ribbon Box of many weeks ago. It seemed like such a great idea to make the box with all those great grommets through which to thread my 1/8" ribbons.

 Unfortunately it has not been working well. 
It seems that when I pull out a ribbon, the spool either backs off afterwards causing the ribbon to pull out of it's tidy little hole OR the ribbon spool spins more than it should when I pull it out. This causes a chaotic mass of a spaghetti-like environment inside the box. There is a constant respooling of the ribbons or rethreading of ribbons through their individual holes in the box. 
No matter what I do, this is not working like I would hope.

That is why I have scrapped this idea, taken all the ribbons out of the box, and set up another method.
If I can't have easy access to my stash, then I will find ways to NOT use ribbons.
This is not a good option for me because I enjoy incorporating them into my projects!

Here is the solution to the problem:

A nice wood, 2-bottle divided wine box!
Originally the extra ribbon spools were put in this box since the grommet box didn't hold all of them anyway.

The inside.
ALL my ribbons fit (for now at least!), and I can easily pull one out when I need it.
So much better.

And now to continue the Hobby Horse project...
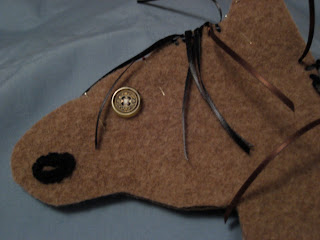
I decided to make mane with black and brown 1/8" ribbon using a needle to stitch the individual pieces. Then they will be tied so that either side will be symmetrical, and the mane will not just flow over one side of the horse's head.

You can see here the ribbons that have just been stitched through the fabric.
I will tie the rest to finish this phase of Hobby Horse.

Last night I said I would ponder the idea of the nostril. 
Now I think instead of this black one I will do an embroidered one. So I'm going to take this one out. (Tomorrow!)

I wanted to get more of this completed today, but the ribbons took some of my Horse Time.
But do not fear; I will return to this project on Tuesday.

And you must be aware that I am chomping at the bit to complete this guy :-]. 

Hobby Horse: Day 96

Revamping An Old Pony
Sunday, April 24, 2011

At a thrift store I found a dear little hobby horse that needed loving.

Here is the pony:

Poor boy is losing his mane, and a little bit of his stuffing is showing.

This is the other side.
Apparently this guy had no eye on this side. Perhaps mane, but the glued areas are showing (dark splotches by the ear), and no mane is left.

I traced around the horse head shape to make a new pattern.

I placed it on the nice, soft lambs wool sweater, and cut out the pattern

Now for the eyes.
Just the right button must be chosen.
This is one of my button containers.
Black or brown for the eyes? I chose brown.

These are the buttons.
The centers have a bit of metal, the outer rims are a mottled light and darker brown plastic.

Now the eyes are in place.

Time is drawing late.
I thought that the new pony needed nostrils, so I am trying this to see if it will work.
This project will be continued tomorrow.
I need to think about what I want for the mane as well as how to attach it.
Perhaps a few more details as well.

See you then!

Sunday, April 24, 2011

Pincushion Tutorial: Day 95

How About Joining Me To Make A Project?
Saturday, April 23, 2011

Tonight I made a China Cup Pincushion.
My invitation goes out for you to make one, too.
The instructions are straightforward and simple.

What you will need:

1.  A China cup
2. A small scrap of felted sweater
3. Thread
4. Needle
5. Small amount of Polyfil stuffing
6. Glue (see below)
7. Fancy pins, buttons (optional)
8. Oh, yes, your 2 hands!


This is the China cup that I retrieved for 50 cents at a local thrift store.
I made a pattern by drawing around the rim of the cup, then allowing about 1" extra.
Cut your sweater piece from this pattern.

Once you have cut out your circle of fabric, thread your needle and start a running stitch around the edge approximately 1/4" to 3/8" from the outer edge. Do not knot the thread end, but leave enough extra that you can let the tail hang out to tie it to the opposite end.

These will be the gathering stitches to pull this into a nice little ball for the cushion.
I used a heavier thread, more like an embroidery weight. You can also use quilting thread. Use your imagination. I like something a bit heavier so when it is gathered it won't break and will hold together well.

Once you have stitched around the entire circle pull the threads so that the edges will stand up around the future ball.

Put the polyfil into this little "cup" with extra billowing out.
As you draw up the threads you can push the extra stuffing inside to make the pincushion firm.

Now you can start drawing up the gathering threads.

At this point pull the threads as tight as you can to close the opening.
Tie the threads.
I like to leave the threads and push them inside the ball.


Chop sticks are the best tool (and so very technically scientific!) to stuff the threads inside the ball.
They are also excellent for arranging the stuffing if it needs mushing around.

Part of the beauty of these chop sticks in particular is the squared tops, though any wooden, non polished chop stick is fine. The rough surface keeps it from sliding.


Now all you have to do is plop the ball into the China cup.
You may glue it to keep it from sliding around. I use E-6000 which will bond fabric and ceramic.
This glue also works on many other materials.
Please be sure to read the instructions so you are using it safely.

You may decorate your pincushion with pretty pins and perhaps some buttons.
Maybe a ribbon, too.
(You know how I love ribbons.)

Enjoy your pincushion!

Saturday, April 23, 2011

Earth Day Barn Owl: Day 94

My Barn Owl Is Completed!
Friday, April 22, 2011

Though I wasn't planning this, I think it especially appropriate that my owl is ready to fly on Earth Day.
He and I have enjoyed his phases of growth over the last 3 days of the project, and now he is ready to fledge. In fact he says he might just stay in the neighborhood so we can keep a close relationship.
We are birds of a feather!

NOTE: Again, thanks go to Mossy for the inspiration for my owl.
Though mine is very different from hers, I appreciate her tutorial and all the interesting information that she provided about owls in her blog. HERE is Mossy's blog to see her owls and instructions again. (You will need to scroll down to her blog of April 14, 2011, which is down the page a bit.)

Here are the finishing touches of my little barn owl:

Completed facial disk with right wing completed and left wing prior to the gathering at the top and trimming to make the feathers. This way you can see the shape I used for the wings.

Both wings ready to sew onto the body, and face placed in position.

Barn owl in his temporary "tree".
This is a branch and eucalyptus leaves that I made into a mobile a few years ago. Since I have completed my owl in the dark of night it would have been hard to photograph him in a real tree. 

A profile.
Notice the curved beak. (Mossy made a point of encouraging the beak to be curved at the base--used for disassembling caught prey!)
Side view.
Now you can see the wing at it's best.

The barn owl doesn't have visible tufts on it's head like some of the other owl varieties.
It has quite a smooth head shape.

Ever so cute Barn Owl!

A great adventure the last few days, and now a new member of my animal family.

Hope you have had a very good EARTH DAY!
Keep greening our Planet Earth.